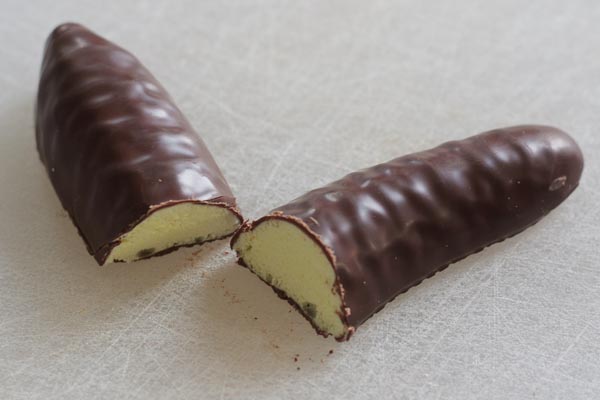
Pizza Stones – What You Need to Know

We lost a good friend a couple days ago… our pizza stone. It had survived 2 moves and plenty of good bread baking and pizza making. I think what may have finally done it in was a leaking calzone. I tried making calzone and I made the second one up too soon so the dough became soaked and the tomato sauce and cheese escaped. When the wet tomato hit the super hot stone, it cracked.
One of the things I love/hate about cookware is the infinite variants on products, each supposedly superior. Even better than the variety of offerings is the fan club each attracts, who are willing to duke it out over which product is superior. Pizza stones are no exception!
I think I got my old pizza stone from the now defunct Linens n’ Things for a princely sum of somewhere around $14. This was back before I thought to check the internet to see what was available. Apparently you can get entire kits that turn your oven into a hearth by lining it with baking stones.
For normal baking/pizza stones there are a couple of options. You have your basic ceramic, 14″ round pizza stone, like the one I started out with. It is pretty light weight and the material it is made out of isn’t the strongest. That said, the one I had lasted me over 5 years so they do work pretty well. You can also just used unglazed quarry tiles from Home Depot. They are cheap enough to outweigh any problems. I haven’t tried that route, but a quick google should set you straight.
Weight is a big deal. In general, the heavier something is, the better it holds heat. This means that when you put in a wet, relatively cooler pizza, a heavier stone will not cool off as much and remain hotter. The only problem is that heavier things also take longer to heat up. It is similar to moving a heavy object, it takes more energy to get it moving, but once it is going it takes more to also stop it.
Of course being driven by American consumer culture, I had to upgrade my pizza stone instead of simply getting another generic one. In the premium pizza stone world there are two different camps. On one side are stones made out of Fibrament and on the other are stones made with a high strength ceramic, Cordierite, that is used inside of pottery kilns.

I am not going to get into which option for these high end stones is better. There is a great thread here where participants do a much a better job than I could. If you are interested in a Fibrament stone, their site is here. There are a number of options for Cordierite stones. Cook’s Illustrated choose a Cordierite baking from Old Stone Oven as their favorite, although the Fibrament came in a close second. There are a number of different people selling the Old Stone Oven one, including Amazon and King Arthur . I ended up just buying it from Williams Sonoma because it didn’t have to worry about it breaking during shipping, apparently a problem with Amazon. The factor that won me over though was that it has a lifetime guarentee from Williams Sonoma that it won’t crack and I can just bring it back to the store for an easy exchange if it is; much better than having to worry about shipping.
I have only had a chance to use it once due to DC’s currently oppresive heat, but I will update this as I get to use it more. The pizza (fig, caramelized onion, pear and blue cheese!) I tried on it came out fantastic, so no regrets yet!

Sloppy Joe’s – The Bar, The Sandwich… The Legend

You may not know it, but that Sloppy Joe you enjoyed in an elementary school cafeteria was not named after sloppy cafeteria worker named Joe. The sandwich actually gets its name from the famed Key West bar it was invented in, Sloppy Joe’s. While Ernest Hemingway was living in Key West, his favorite bar was said to be Sloppy Joe’s, and that has helped it become a bit of a tourist destination. Don’t let that dissuade you, it is well worth the trip and even touristy things in Key West have their own funk. If you want something a slightly more off the beaten path, try the Green Parrot Bar.

Carolyn and I head south last fall as a prelude to the kid… a babymoon if you will. The atmosphere at Sloppy Joe’s is nice and laid back. It is dark and cool inside and provides a nice retreat from the heat outside. There are mementos on the wall and unlike your local TGI Fridays, these are the real deal and there is a story behind all of them. When we swung by there was even some live music going.

The sandwich itself should have the same amount of character as its namesake bar. It is nicely browned ground beef, smothered in a tangy tomato gravy. We tried make it ourselves when we got home and the results were pretty good. Unfortunately we couldn’t replicate the atmosphere, but I guess it is good that we don’t live in a bar.
Sloppy Joes Recipe
From: Simply Recipes
Note:
The trick to this recipe is to brown the meat well, on high heat. Don’t crowd the pan, work in batches, and don’t stir the meat until it is well browned on one side. It helps to use a large cast iron pan, or an anodized aluminum pan, as these pans can handle the heat and are relatively stick-free.
Ingredients:
- 1 Tbsp olive oil
- 1/2 cup minced carrots (can sub chopped bell pepper)
- 1 cup chopped onion (about 1 medium onion)
- 1/2 cup chopped celery
- 2 cloves garlic, minced
- Salt
- 1 1/4 lb ground beef
- 1/2 cup ketchup
- 2 cups tomato sauce (or 1 15-ounce can whole tomatoes, puréed)
- 1 Tbsp Worcestershire sauce
- 1 Tbsp red wine vinegar
- 2 Tbsp brown sugar
- Pinch ground cloves
- 1/2 teaspoon dried thyme
- Pinch cayenne pepper
- 2 turns of freshly ground black pepper
- 4 hamburger buns
Directions:
- Heat olive oil in a large sauté pan on medium high heat. Add the carrots and sauté for 5 minutes. (If you are using bell pepper instead of carrots, add those at the same time as the onions.) Add the chopped onion and celery. Cook, stirring occasionally until onions are translucent, about 5 more minutes. Add the minced garlic and cook for 30 more seconds. Remove from heat. Remove vegetables from the pan to a medium sized bowl, set aside.
- Using the same pan (or you can cook the meat at the same time as the vegetables in a separate pan to save time), generously salt the bottom of the pan (about 1/4 to 1/2 teaspoon). Heat the pan on high. Crumble the ground beef into the pan. You will likely need to do this in two batches, otherwise you will crowd the pan and the beef won’t easily brown. Do not stir the ground beef, just let it cook until it is well browned on one side. Then flip the pieces over and brown the second side. Use a slotted spoon to remove the ground beef from the pan (can add to the set-aside vegetables), salt the pan again and repeat with the rest of the ground beef.If you are using extra lean beef, you will likely not have any excess fat in the pan.
If you are using 16% or higher, you may have excess fat. Strain off all but 1 tablespoon of the fat.
- Return the cooked ground beef and vegetables to the pan. Add the ketchup, tomato sauce, Worcestershire sauce, vinegar and brown sugar to the pan. Stir to mix well. Add ground cloves, thyme, and cayenne pepper. Lower the heat to medium low and let simmer for 10 minutes. Adjust seasonings to taste.
What should we plant?

Good news loyal readers… we just got a plot in our local community garden! Back we had a balcony we used to grow basil and cherry, but now the sky (or our 4′ plot) is the limit.
I want to branch out from this. My plan is to go for some herbs and other things that cost a lot in the store. Does anyone else have any better ideas? Let us know in the comments… especially all you bloggers in Adams Morgan, you might get some of the haul.
Cast Iron Pizza

People goto great lengths to try and replicate authentic pizza at home. One of the main things separating the pizza you make from the pizzerias is heat. I read about one guy who used the cleaning cycle of his oven to get it really hot and then jerry rigged the latch so he could open it mid-cycle to retrieve the pizza before it turned into a crisp. That is pretty extreme. I also wouldn’t recommend it unless you are well insured and know what you are doing.

This concept is slightly less extreme. In order to achieve a similar level of heat you heat a cast iron pan on the stove, invert it and then use it like a pizza stone and cook the pizza under the broiler. The intense heat of the broiler, combine with all the hotness stored up in the pan, gives you an environment similar to a real pizza oven. Or at least it is supposed. I found out the hard way that you have to do a good job of rolling out the dough. Mine was a little too thick. I had a nice cooked top, a slightly charred crust and in between that was a doughy mess. It all tasted good, but there is definitely a learning curve.

I tried using a soapstone pizza pan I had and a cast iron pan. Both worked really well, so just use what you have. One limitation of this technique is that the bottom of most pans is rather small, maybe 10″ across at best (Pan diameter is measured at the top). If you really like this technique, you might want to check out the Cast Iron Pizza Pan that lodge makes:

It gets hot in the summer here in DC and we have our AC on for most of the time. One of the real advantages of this technique is that you don’t need to preheat the oven and get a large pizza stone hot. I think it will take a few more tries for me to perfect this method, but if it keeps the kitchen cooler and gives good results, I am game!

There is a good write up and some recipes that use this technique in the Atlantic and in Serious Eats. I followed the Serious Eats one when I gave it a try.
Epic Bread Baking: The Miche

I know the phrase “Epic” is totally played out and is tossed around way too easily, but seriously how else do you describe a 4 pound loaf of bread that is over a foot and a half across. If a loaf that large is not considered Epic, what would be? The name for this large style of bread is “miche”. According to the Internet it is French slang for “butt check”, which is why I don’t trust the Internet. It is generally a rustic style, round, rather flat loaf… that is extremely large.

The first version I tried was from Bread Baker’s Apprentice, it is the bread featured on the cover that is larger than the baker’s head. It is based on the famous loaf from the Poilane bakery in France. The recipe calls for high extraction flour, which is somewhere between whole wheat and white flour. It is also not easy to come by, so of course I just used whole wheat instead… and that of course just produced a dense hard loaf; a 2 foot hockey puck. I think a couple things contributed to this. I tried kneading it by hand and I also didn’t increase the amount of water since I was using whole wheat.

A stronger man would have had another go at it, but I decide to wave off and try a different recipe. For the second attempt I went with recipe from Artisan Baking, which is a really great book that does not get enough love. It not only covers how to bake bread, but also the people that are drawn to making bread. The recipes are truly stellar too.

The miche in Artisan Baking stills uses only sourdough to rise, but it has a mix of flours; whole wheat, white and rye. This makes it easier to build up gluten. It could have been just luck, or all the fact that I used my mixer to knead, but this loaf was amazing. I wouldn’t try using any old mixer for this large a loaf with such dense dough. I have a Kitchen Aid Pro 600 and it seemed to handle it fine. A smaller mixer, like the Kitchen Aid Artisan, may not have done so well. While it produce a tons of bread (roughly 4 pounds), the bread stayed fresh for 3 weeks and tasted great with just a light toast. For most of the time we stored the bread with the cut side facing down on the cutting board. It could be that most bread will last this long, it just isn’t usually large enough to last 3 weeks. I would like to that the sourdough goodness helps keep it fresh longer.

One of the things I love about the Artisan Baking book is that she profiles the different bakers & bakeries she gets the recipes from. The recipe for the French country miche comes from Thom Leonard in Lawrence, Kansas. There are some great videos of him explaining how to make naturally leavin bread here.


Thom Leonard’s Country French Bread

Maggie Glezer, Artisan Baking
Yield: Makes one 4 pound (1.8-kilo) loaf
Time: At least 18 hours with about 30 minutes of active work
Note: Much of what makes this bread so special is the high-extraction flour used in it. This is a bolted whole-wheat flour much lighter in color and sweeter in flavor than a whole-wheat flour (at 100% extraction), but much darker and more flavorful than a white flour (at 72% extraction).
The method I give here for making your own high-extraction flour will work best on coarsely ground whole wheat flour. If you already have a good high-extraction flour, substitute it for the whole-wheat and bread flour in the final recipe. Thom also includes a little of his sourdough rye starter in the dough, but it is such a small amount that I have bumped up the levain slightly and added rye flour to the final dough instead.
The evening before baking – making the Levain:
- 25 grams (1 1/2 tablespoons or 0.8 oz) fermented firm sourdough starter refreshed 8 hrs before (17%)
- 140 grams (2/3 cup or 4.9 oz) water, lukewarm (100%)
- 140 grams (1 cup minus 1 tablespoon or 4.9 oz) unbleached bread flour (100%)
Dissolve the sourdough starter in the water in a small bowl. Add the flour and beat this batter-like dough until very smooth. Place in a covered container and let it ferment overnight for 8 hours, or until fully risen and just starting to sink in the middle.
Bake Day – Mixing the Dough:
- 350 grams (about 12 oz or about 2 1/2 cups) Coarsely ground whole-wheat flour, preferably milled from an organic, hard winter wheat (eventually 25%)
- 750 grams (26.5 oz or 5 cups) unbleached bread flour, preferably organic (75%)
- 30 grams (1 oz or 1/4 cup) organic whole-rye flour (3%)
- 660 grams (24 oz or 3 cups) water (66%)
- Fermented levain (30%)
- 23 grams (0.8 oz or 1 tablespoon plus 1 1/2 teaspoons) salt (2.3%)
Preparing the flour:
- Sift the whole-wheat through your finest sieve or flour sifter. The large flakes of bran should be caught in the sieve (use them for flouring your peel or for muffins). Measure out 2 cups 3 tablespoons (8.8 ounces, 250 grams) sifted flour. Mix this dark flour with the bread flour and the rye flour in a large bowl or in the work bowl of your mixer.
- Add the water to the fermented levain to loosen it from the container.
Mixing the dough:
By hand: Pour the watered levain into the flours and stir with your hands or a wooden spoon just until a rough dough forms. Turn the dough out onto the unfloured work surface and continue kneading until the dough is very smooth and shiny, about 10 minutes. This is a lot of dough and will take some muscle. Sprinkle on the salt and continue to knead the bread until the salt has fully dissolved and the dough is very smooth and shiny.
By stand mixer: Add the watered levain to the flours in the work bowl and stir the dough together with a wooden spoon or your hand (this will make the mixing go more quickly). Using the dough hook, mix the dough on medium speed for about 10 to 15 minutes, or until the dough is very smooth and almost cleans the bowl. Add the salt and continue mixing until the dough is much tighter and cleans the bowl, about 5 more minutes.
This should be a soft, sticky, and extensible dough.
Fermenting and turning the dough:
Place the dough in a container at least 3 times its size and cover it tightly with plastic wrap. Let it ferment until it is airy and well expanded but not yet double in bulk, about 3 hours. Turn the dough 3 times at 30-minute intervals, that is, after 30, 60, and 90 minutes of fermenting, then leave the dough undisturbed for the remaining time.
Rounding and resting the dough:
Flour the surface of the dough and your work surface and turn the dough out. Tuck the edges of the dough in to tighten it, round it, and cover it loosely with plastic wrap. Let it rest until well relaxed, 10 to 15 minutes. While the dough is resting, sift flour over a linen-lined basket or line a large colander with a well-floured tea towel.
Shaping and proofing the dough:
Shape the dough into an even and tight round loaf without deflating it. Place the dough topside down in a linen-lined basket or large colander, lightly sprinkle it with flour, and cover it well with plastic wrap. Proof the dough until it is well expanded, about doubled in volume and remains indented when lightly pressed with a floured finger, after about 4 hours.
Preheating the oven:
At least 45 minutes before the dough is fully proofed, arrange a rack on the oven’s second-to-top shelf and place a baking stone on it. Clear away all racks above the one being used Preheat the oven to 450°F (230°C).
Baking the bread:
If desired, just before baking the bread, fill the oven with steam. Turn the bread out onto a sheet of parchment paper or a floured peel and slash 3 to 4 diagonal slashes and 3 to 4 horizontal slashes into the top. It will look like a skewed grid with diamond-shaped openings. Slide the bread, still on the paper, onto the hot stone and bake until the bread is dark and evenly browned all around and sounds hollow when thumped on the bottom, 70 to 80 minutes, rotating it halfway into the bake. If the bread is browning too quickly, reduce the oven temperature to 400°F (205°C), but still bake the bread for at least 70 minutes. Let the bread cool on a rack.