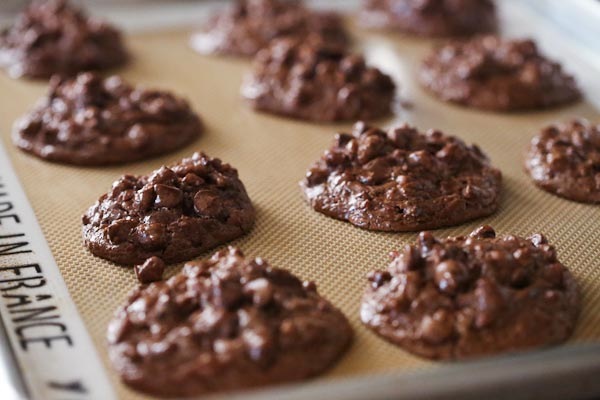
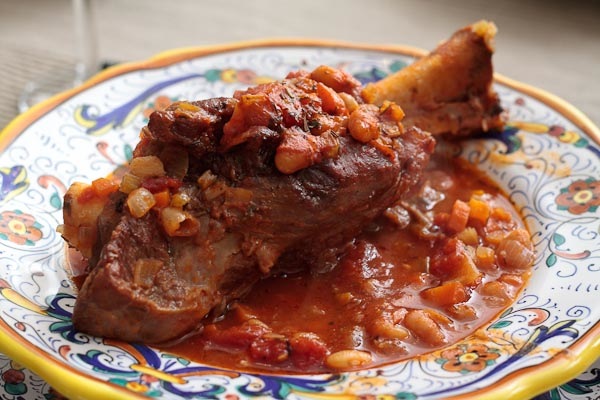
Guest Chef: Pecan Pie

This Guest Chef post is from Carolyn’s mom.
This is not your traditional pecan pie recipe, in looks or taste. It is neither gooey nor overly sweet. That is exactly why our family loves it! On top of that, it is so easy to make that you might feel guilty accepting your family’s accolades. It’s become a family tradition to serve this pie at Thanksgiving and Christmas dinners and other special occasions.
I discovered this untraditional recipe over 20 years ago in the recipe booklet that came with my Hamilton Beach blender, which is over 30 years old–my husband’s from his bachelor days. And yes, it’s “avocado green.”

Everything goes in the blender so there’s very little mess. I’ve reduced the amount of sugar a little from the original recipe and no one has ever noticed. When the pie first comes out of the oven, it is nice and puffy, a beautiful sight.
Since this is still a “rich” dessert, I recommend that you serve small slices. Top it off with a scoop of coffee ice cream. Enjoy!

Pecan Pie
Ingredients:
- 3 eggs
- 2 tablespoons butter, softened
- 1/2 cup heavy cream
- 1 1/2 cups pecans
- 1/2 cup dark corn syrup
- 1/4 teaspoon salt
- 1/4 teaspoon cinnamon
- 3/4 cup sugar
- 1/2 teaspoon vanilla
- 1 9-inch unbaked deep dish pie shell
Directions:
- Preheat oven to 400 degrees. Put all ingredients except pie shell in blender in order listed. Cover and blend on chop until nuts are coarsely chopped, about 8-10 seconds.
- Place pie shell on cookie sheet. Pour mixture into unbaked pie shell. Bake about 35 minutes or until crust is browned and filling is puffed. Cool.
- If making ahead of time, store in refrigerator, but bring to room temperature before serving.
Lazy Baker Cookies: Double Chocolate Chip

The Lazy Baker sent us a cookie mix to try. Just how lazy of a baker am I? Well, it took me a good 2-3 months to get around to making the cookies. It’s not that I was lazy, but that I was waiting for an occasion to make them. Actually, our ambitions were quite high initially…we were going to do a cookie bake-off between the Lazy Baker cookies and cookies from scratch. But, alas, time got away from us. Finally, coworkers were throwing me baby shower, so I decided to make the cookies.
The Lazy Baker is supposed to make cookie making easy. You get all the dry ingredients in a tin, and all you have to do is add the wet ingredients. It’s the cookie equivalent of making cake from a box. So, you’re thinking it’s pretty easy, how could anyone mess it up? Well, leave it to me. I couldn’t find the camera, so I missed the opportunity to show you the “out takes,” but I think the main problem stemmed from using butter that was not at room temperature. Totally my fault, not Lazy Baker’s. I was going to give up on the cookies, but Luke came in and thought they were salvageable. (This is a prime example of why Luke does the cooking and I do the dishes.)
The batter was very dry, which is not what I was expecting and the reason I thought they weren’t going to come out right. But very little liquid actually goes into the mix…just 1 egg and 1 teaspoon of vanilla.

As you can see, we tried two different methods of placing the cookies on the cookie sheet…smooth balls and messy clumps. It made no real difference in the outcome of cookies.
So, what was the verdict from the baby shower? Thumbs up on taste…they all got eaten! I didn’t tell anyone the near cookie disaster. Personally, I thought the cookies tasted a little gritty, but no one at the shower seemed to notice, or they didn’t say anything.
The Lazy Baker saves you a little bit of time because you don’t have to mix the dry ingredients, but it still takes time to mix it all together. Is it worth it? Maybe for some people. If you have all the dry ingredients on hand in your pantry, you may just want to make cookies from scratch. But if not, the Lazy Baker may be the answer to your cookie cravings.

Gougeres

YUMMMM….Cheesy, puffy, goodness! That basically sums up gougeres. The recipe makes at least 4 dozen cheese puffs, so it’s a good, simple recipe for a cocktail party or dinner party appetizer. And people will certainly be impressed!

We don’t have a pastry bag, but cutting off the corner of a zip-lock bag and squeezing the cheese puffs on the tray that way worked fine. You can also spoon the batter on to the baking sheet, but that will take longer. You’ll want to get these in the oven as soon as possible so you can eat them! So light and fluffy, easy to pop one into your mouth!

Gourgeres
From The Gourmet Cookbook
Ingredients:
- 1 cup water
- 1 stick (8 tablespoons) unsalted buter, cut into tablespoons
- 1/2 teaspoon salt
- 1 cup all-purpose flour
- 4-5 large eggs
- 1 1/2 cups finely grated Gruyere (about 4 ounces)
- 2 tablespoons finely grated Parmigiano-Reggiano
- Rounded 1/4 teaspoon freshly grated nutmeg
- 1/4 teaspooon freshly ground black pepper
Directions:
- Put racks in upper and lower thirds of oven and preheat to 375. Line two large baking sheets with parchment paper or lightly butter them.
- Combine water, butter and salt in a 3-quart heavy saucepan and bring to a full boil over high heat, stirring until butter is melted.
- Reduce heat to moderate, add flour all at once, and cook, stirring vigorously with a wooden spoon, until mixture pulls away from sides of pan, about 30 seconds. Continue to cook and stir to remove excess moisture for about 1 1/2 minutes. Remove from heat and let cool slightly, about 3 minutes.
- Add 4 eggs, one at a time, beating well with wooden spoon after each addition; batter will appear to separate but will become smooth once beaten. Mixture should be glossy and just stiff enough to hold soft peaks and fall softly from a spoon. If it is too stiff, beat remaining egg in a small bowl and add to batter 1 teaspoon at a time, beating and then testing batter after each addition until it reaches desired consistency.
- Stir in cheeses, nutmeg and pepper.
- Fill pastry bag with batter and pipe fifteen 1-inch-diameter mounds 1 inch apart onto each baking sheet. Bake, switching positions of sheets halfway through baking, until puffed, golden, and crisp, about 30 minutes total. Serve warm.
7 Hour Lamb – in a Slow Cooker

This year we stuck around for Thanksgiving instead of going up to Massachusetts. It was our first time not traveling, so for the first time we got to got to plan a Thanksgiving meal. Instead of making a traditional turkey we decided to make lamb. As long as you are roasting a large amount of meat, I think anything goes.


Luckily for us finding recipe ideas was pretty easy thanks to the Lamb Rules issue that Saveur recently did. They had what sounded like a great recipe, a leg of lamb that is braised in a white wine liquid for seven hours. There were only going to be three of us having dinner so I didn’t go for the whole leg of lamb. They didn’t have any half legs of lamb with the bone in, so I went boneless, which allowed met to practice my butcher tying skills.


While the thought of having a leg of lamb slowly cooking for seven hours sounds pretty good, I didn’t want to tie up the oven for the whole day; we had a lot of other tasty treats to make. So instead of using the oven, I adapted the recipe for the slow cooker. I actually didn’t have to change too much. The only trick was that in order to get the crock pot to simmer, I had to switch it back and forth between warm and low. If I left it on low, it would have gotten too hot and gone to a full boil.

The recipe included a great dean dip to serve with the lamb. It is great and totally worth the effort. You don’t need to soak the beans overnight, you just may need to cook them for a little longer.

The lamb probably doesn’t need the full seven hours of cooking, but if you keep the temperature low, it shouldn’t hurt it any. If you are pressed for time, just cook it until it is tender and falling off the bone. Depending on the size of your slow cooker, you may need to get a boneless cut and tie it. There is a great video on how to tie a roast here. I placed a bunch of cloves of garlic and a few sprigs of rosemary in the middle of lamb before tying. I also used a fat separator
to remove the fat from the cooking liquid and made a great gravy for the lamb and beans.

7 Hour Braised Leg of Lamb – in a Slow Cooker
Gigot de Sept Heures (in French)
Ingredients:
For the lamb:
- 1 4-pound shank end leg of lamb or a 4 pound piece of shoulder, trimmed
- 3 tablespoons extra virgin olive oil
- Kosher salt and freshly ground black pepper, to taste
- 1 750-ml bottle dry white wine
- 20 cloves garlic, unpeeled
- 10 sprigs each fresh rosemary, thyme and savory
- 5 fresh or dried bay leaves
For the beans:
- 2 cups dried white beans, preferably cannellini or white coco, soaked overnight
- 5 cloves garlic, smashed
- 3 sprigs fresh thyme, parsley and a bay leaf tied together with kitchen twine
- 10 whole cloves
- 1 large onion, halved
- Kosher salt and freshly ground black pepper, to taste
- 2 tablespoons extra virgin olive oil
- 2 tablespoons crème fraîche (or some other cream)
Directions:
- If the cut of lamb is boneless, tie. Rub the lamb with oil and season generously with salt and pepper.
- Heat a 6 quart Dutch oven or large pan over medium-high heat. Add lamb and cook, turning occasionally, until browned on all sides, about 12 minutes. Transfer lamb to a plate.
- Nestle garlic and herbs into crockpot; place lamb on top of herbs; add pan juices and any brown bits from Dutch oven. Add wine and 2 cups water to the slow cooker. Cover and leave on high for 3 1/2 hours. Turn the lamb 3-4 times as it cooks. Turn the slow cooker to low and try to keep it at a low simmer. Cook until the lamb is very tender, about 3–3 1/2 more hours. Transfer to a rack, cover with foil and let cool for 20 minutes.
- Meanwhile, prepare the beans: About 1 1/2 hours before the lamb is done, drain beans and transfer to a 4 quart saucepan along with 6 cups water, 4 cloves garlic, and the herb bundle. Insert the cloves into the onion and add to the pot.
- Bring to a boil, reduce heat to low, cover, and simmer until beans are tender, about 1 hour.
- Remove pot from heat and season with salt and pepper. Discard herbs and strain beans, reserving cooking liquid.
- Transfer 2 cups beans, 1⁄4 cup cooking liquid, oil, crème fraîche, and remaining garlic clove to a blender and purée.
- Stir puréed bean mixture and about 1 cup of the cooking liquid back into pot and cover to keep warm until lamb is cooked. Serve the lamb sliced or torn into chunks, alongside the beans.
Cranberry-Nut Rolls

Even though we decided to cook a lamb for Thanksgiving instead of a Turkey, we still wanted to feature some traditional Thanksgiving/holiday flavors. Cranberries are one of those quintessential ingredients that make an appearance between Thanksgiving and Christmas.

This recipe from bon appetit seemed perfect…we needed some bread for the meal and the walnuts and cranberries in the rolls would complement the apple-walnut-cranberry salad that we had planned. These would also be good with some brie or goat cheese.
We used milk, but didn’t warm it first because we used instant yeast which doesn’t need to be warmed up.

The recipe called for dividing the dough into 12 pieces, which yielded 12 pretty big rolls. Next time, I’m going to make them half as big which will give me twice as many…a good thing, because they are really yummy! You can freeze some and pull them out for dinner or brunch. To freeze: Wrap in foil, then enclose in a resealable plastic bag and freeze up to 2 weeks. Thaw rolls at room temperature. Warm rolls wrapped in foil in 350 degree oven for about 10 minutes.

Cranberry-Nut Rolls
Ingredients:
- 1 cup coarsely chopped walnuts
- 3 1/2 cups (or more) bread flour
- 1 tablespoon (packed) golden brown sugar
- 1 1/2 teaspoons quick-rising dry yeast (from one 1/4-ounce envelope)
- 1 1/2 teaspoons salt
- 1 1/2 cups whole milk
- 2 tablespoons vegetable oil, plus additional for coating bowl
- 1 large egg
- 1 cup sweetened dried cranberries
- Nonstick vegetable oil spray
- 1 large egg, beaten to blend (for glaze)
- Raw sugar
Directions:
- Stir nuts in dry skillet over medium heat until toasted, about 5 minutes. Cool.
- Mix bread flour, brown sugar, yeast and salt in bowl of heavy-duty stand mixer fitted with paddle attachment.
- Warm milk in small saucepan over low heat until instant-read thermometer inserted into milk registers 95 degrees. Add oil; remove from heat. Add milk mixture and 1 egg to flour mixture. Mix on low speed until wet coarse ball forms, about 1 minute.
- Add nuts and cranberries. Replace paddle attachment on mixer with dough hook. Mix dough on low speed until smooth, elastic, and slightly tacky, adding more flour by the tablespoon as needed, about 4 minutes. Transfer dough to floured surface; knead 2 minutes.
- Lightly oil large bowl. Shape dough into ball; place in prepared bowl, turning to coat with oil. Cover with plastic wrap and let rise at room temperature until almost doubled in volume, 1 3/4 to 2 hours.
- Line large rimmed baking sheet with parchment paper. Transfer dough to unfloured surface; divide into 12 equal pieces. Using cupped hand, roll and rotate 1 dough piece firmly on work surface until dough piece pops up into cupped hand as smooth round ball, about 6 rotations. (This will make dough ball as smooth as possible; if necessary, wipe work surface with damp paper towel to help create traction.) Repeat with remaining dough pieces.
- Transfer rolls to prepared baking sheet, spacing apart. Spray rolls with nonstick spray. Cover loosely with plastic wrap and let rise at room temperature until 1 1/2 times original size, about 1 1/2 hours. Brush rolls with egg glaze; sprinkle with raw sugar. Let rise 15 minutes longer.
- Meanwhile, position rack in center of oven and preheat to 425 degrees.
- Place rolls in oven; reduce oven temperature to 400 degrees and bake 7 minutes. Rotate baking sheet; bake rolls until golden and slightly firm to touch, about 8 minutes longer. Cool completely on rack.