There are bread recipes, and then there are bread recipes. This is one of the latter. The bread’s taste, texture, crust and even recipe, strike the perfect balance between complex and simple. It is something in between sandwich bread and a rustic country loaf. This recipe has a lot of steps, but it is pretty much fool-proof. You will end up with something tasty, if not pretty!
This bread’s secret is the pre-ferment (or biga) you make the night before and place in the fridge. The pre-ferment gives the bread its flavor and helps out the texture. Using a pre-ferment gives you many of the benefits of a sourdough, but is a ton easier.
The recipe may look a little complicated at first, but really it is pretty easy. Here is a quick overview:
- Mix the pre-ferment – flour, yeast and water, together in a bowl with a spoon
- Refrigerate the pre-ferment over night
- Mix the pre-ferment together with remaining items for the dough (salt, water, flour and yeast)
- Let the dough rise for 2-3 hours, turning every hour
- Shape into a loaf, and let rise for an hour
- Bake!
Here are some good things to have for this recipe, but you can live without:
- A plastic bench scrapper – These are about $2 at Sur La Table or other kitchen stores. You can get away with a large spatula.
- Parchment paper – Parchment paper is non-stick, silicon coated paper, that is oven safe and make it easy to transfer to loaf to the oven.
- Pizza stone – Helps get you a great crust. Unglazed quarry stones from Home Depot could also work. If you don’t have either of these, just use a baking sheet.
Rustic Italian Bread
This recipe is from Cook’s Illustrated, an amazing magazine. I have added my notes, but it is their recipe and they deserve all the credit.
Notes:
This recipe requires a standing mixer to make the dough, a spray-bottle filled with water for spritzing, a rectangular baking stone, and an instant-read thermometer for gauging doneness. It also requires a bit of patience—the biga, which gives the bread flavor, must be made 11 to 27 hours before the dough is made.
Ingredients:
Biga
- 11 ounces bread flour (2 cups)
- 1/4 teaspoon instant yeast
- 8 ounces water (1 cup), room temperature
Dough
- 16 1/2 ounces bread flour (3 cups)
- 1 teaspoon instant yeast
- 10.7 ounces water (1 1/3 cups), room temperature
- 2 teaspoons table salt
Directions:
For the biga:
Combine flour, yeast, and water in bowl of standing mixer fitted with dough hook. Knead on lowest speed (stir on KitchenAid) until it forms a shaggy dough, 2 to 3 minutes. Transfer biga to medium bowl, cover tightly with plastic wrap, and let stand at room temperature until beginning to bubble and rise, about 3 hours. Refrigerate biga at least 8 hours or up to 24 hours.
For the dough:
- Remove the biga from refrigerator and it let stand at room temperature while making dough.
- To make the dough, combine flour, yeast, and water in bowl of the standing mixer fitted with dough hook. Knead the dough on lowest speed until rough dough is formed, about 3 minutes.
- Turn the mixer off and, without removing the dough hook or bowl from the mixer, cover the bowl loosely with plastic wrap. Let the dough rest for 20 minutes. (This allows protein in the dough to relax, making for a stronger dough that can rise higher, with a better crust)
- Remove the plastic wrap over the dough, and add the biga and salt to bowl. Continue to knead on the lowest speed until ingredients are incorporated (dough should clear the sides of the bowl but should stick to the very bottom), about 4 minutes.
- Increase the mixer speed to low (speed 2 on a KitchenAid) and continue until the dough forms a more cohesive ball, about 1 minute.
- Transfer the dough to a large bowl (at least 3 times the size of the dough) and cover it tightly with plastic wrap. Let the dough rise in a cool, draft-free spot away from direct sunlight, until slightly risen and puffy, about 1 hour.
- Remove the plastic wrap and turn the dough following illustrations below on Turning the Dough. Replace the plastic wrap and let the dough rise 1 hour. Turn dough again, replace plastic wrap, and let dough rise 1 hour longer.
- Dust the work surface liberally with flour. Hold the bowl with the dough at an angle over the floured surface. Gently scrape the dough out of the bowl and onto the work surface (the side of the dough that was against bowl should now be facing up).
- If you want two smaller loaves, split the dough into two equal halves. Use a knife or bench scraper.
- Dust the dough and your hands liberally with flour and, using minimal pressure, push dough into a rough 8- to 10-inch square. If you are making two loaves, shape each piece into a smaller rectangle.
- Shape the dough following the illustrations below on Shaping the Loaf, and transfer it to a large sheet parchment paper. Dust loaf liberally with flour and cover loosely with plastic wrap; let loaf rise until doubled in size, about 1 hour.
- Meanwhile, adjust the oven rack to the lower-middle position, and place a baking stone on the rack. Pre-heat the oven to 500 degrees.
- Using a single-edged razor blade, or sharp chef’s knife, cut a slit 1/2 inch deep lengthwise along top of loaf, starting and stopping about 1 1/2 inches from the ends. Lightly spray the loaf with water. Slide parchment sheet with loaf onto baker’s peel or upside-down baking sheet, then slide parchment with loaf onto hot baking stone in oven. If you are not using a baking stone or tile, simply place the baking sheet in the oven.
- Bake for 10 minutes, then reduce oven temperature to 400 degrees and quickly spin loaf around half way using the edges of the parchment paper.
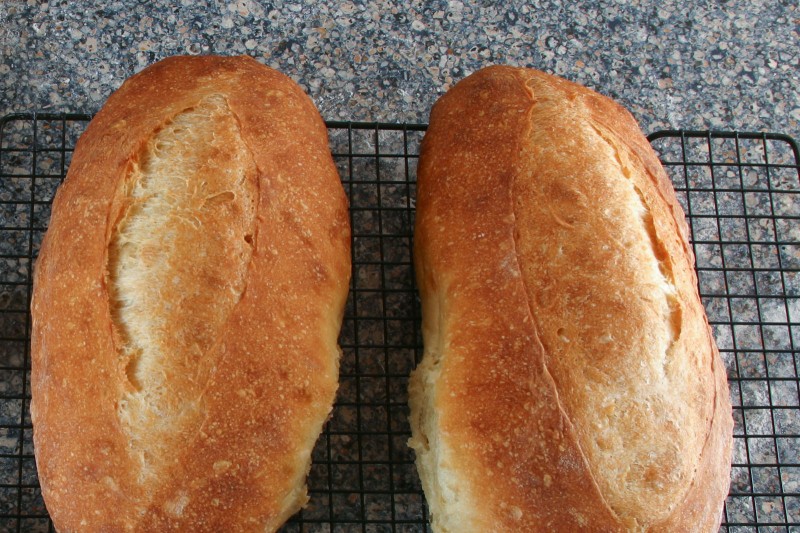
- Continue to bake until deep golden brown and instant-read thermometer inserted into center of loaf registers 210 degrees. For one large loaf this will be about 35 minutes longer. For two smaller loaves this will be closer to 30 minutes.
- When the bread is done, transfer it to a wire rack and discard the parchment paper. Now the toughest part, cool the loaf to room temperature, about 2 hours.
(I traced the illustration from the recipe… I can’t draw this good!)
Turning the dough:
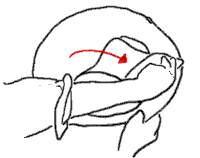
Slide plastic bench scraper under one side of dough; gently lift and fold one third of dough toward center.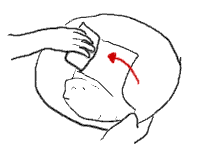
Repeat step 1 with opposite side of dough.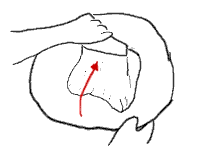
Finally, fold dough in half, perpendicular to first folds. Dough shape should be a rough square.
Shaping the dough:
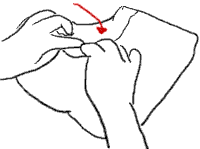
After delicately pushing dough into 8- to 10-inch square, fold top left corner diagonally to middle.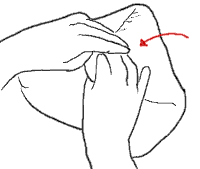
Repeat step 2 with top right -corner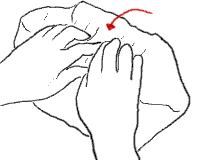
Begin to gently roll dough from top to bottom.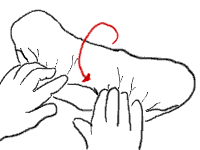
Continue rolling until dough forms a rough log.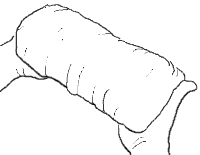
Roll dough onto its seam and, sliding hands underneath each end, transfer dough to parchment paper.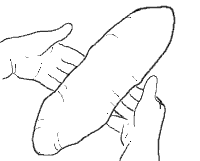
Gently shape dough into 16-inch football shape by tucking bottom edges underneath.
I would love to make this bread; however, I would need to print the recipe. How do I do that? I don’t want to print all the comments, just the recipe.
Hi Sandy, I wish there was an easy way… unfortunate I don’t think there is. You could try copy and pasting it into word and then printing it. I built a whole website to try and solve this: http://www.noshbot.com … but it doesn’t work well with having photos of individual steps.
Try to save the pages of the recipe in PDF form. When you open the file as a PDF file( there will be about 10 pgs. total ) you can choose the particular pages you wish to print. I did this and ended up with just 4 pages ( including pix. & drawings ) of the recipe.
I made this bread on Friday, Dec. 24, 2010 and it is one of the best Italian breads I have ever had. It rivals the bread that was available in Rome and Naples when I traveled there. This is actually the first time I have made bread without using a bread machine, used several tiles for the oven, they cracked but were still usable. I am starting another batch today.
Mmmm, my bread is in the oven although I must say I was about to panic. I have a novice bread maker and had the idea to bring home made Italian bread to a friend’s house who is going to show me how to make ravioli (she is Italian and I am not). The loaves look amazing but they seemed so flat I worried that they would be thin and dense. I see they have really puffed up while cooking. I did not weigh the flour but I guess if I want to keep baking, it would be a good idea to go that route. And I was out of parchment paper (yell from the kitchen, “why is there an empty box of parchment paper in the cupboard!?”). Hubby sneaking away down the hallway :)
Well, I figured there was bread before there was parchment paper (I assume) so I used a pizza peel which meant more handling of the loaves – I bet they will taste good but they may end up looking like bumpy, lumpy and warped – very rustic. Thanks for the recipe!
I meant I AM a novice bread maker :).
Wow, our Italian friend gushed over the bread! Even saying that when her father comes to visit he complains about the bread but he would LOVE this bread. And it did taste wonderful! Her dad had just sent some olive oil he had made from his trees and the bread with the olive oil was amazing. And it was perfect with the traditional Valtellina ravioli she showed me how to make (buckwheat ravioli with walnut pesto, taleggio cheese, orange zest and saffron – how’s that for making your mouth water). Thanks for the great recipe and clear instructions that allowed a novice like me to pull it off. :)
how long do you put the stone in before bread and why no glazed tile
You can’t put glazed tile or stone in the oven…. not if you purchased it from home depot or something. If you’ve ever used or seen a pizza stone, you’d know that the stoneware is untreated. The purpose of the stone is that it heats up thoroughly and provides a better heat transfer to your bread dough.
The stone should be in the oven before you start pre-heating. The stone needs to warm up with the oven or you risk the stone cracking/breaking from too quickly changing temperature. My father-in-law ruined his last pizza stone this way. Hope that helps, Michael Kranik.
Hi,
I’m am still looking for a ciabatta receipe as good as this Rustic Italian bread. Anyone know of a great one? My mom is 80 years old and loves ciabatta bread.
Thank you
Try the one on the King Arthur Flour Website.
Anyone know of any other awesome bread recipes. I want to make whole wheat, but afraid it won’t be as good. Need a good recipe.
This is an awesome recipe. Pretty full proof! It amazed my family and frankly I was thrilled with the results. Followed them to a T.
Hi,
I made your bread yesterday, and I’m writing about it today. Can I provide a link to this site in my blog?
Thanks,
Myra
Looking for a tasty new italian dish? Â Check out the Layered Italian Casserole from Contadina -Â http://www.contadina.com/recipes/layered-italian-casserole. Â This message is being posted on behalf of Contadina and we hope that it is of interest for you.
Great Bread. I am new to breadmaking and this was the first truly successful bread batch to satisfy my preference. Plus the family really loved it and we have been toasting bread with butter every morning non stop ever since. I believe I also got better results because I addded 4 tspn of additional gluten to Bread Flour I used in the primary dough batch.
Instead of using a spritzer for oven moisture, I preheated a metal pan on the lowest oven level and then threw a 1/4 cup of water on it for a burst of steam right after putting the risen loaves into the oven. I did nit a 2nd time 10 min later.
The crust and texture were so excellent.
The taste was OK but not similar nor as aromatic to my recollections that I remember from my favorite italian bread store on Arther Ave in the Bronx NY. Next I will try the more liquid [1c water to 1c flour ratio] BIGA to see if it does develop a better taste via an improved fermentation process.
I tried this recipe for the first time and made a mistake. I put the salt in with the rest of the ingredients for the dough. I probably would have gotten a lighter, less dense bread had I not gotten ahead of myself. However, this still turned out a very good loaf of bread, more akin to sandwich bread with a nice crust. Next time I’ll be sure to correct my mistake. Thanks to the creators of this recipe, and to all that have shared their experiences.
Adding the salt too early can slow down the yeast so you don’t get as much initial rise. It is a pretty resiliant recipe as you have seen.
Pingback: MARRAQUETA Y FRICA « Es la Cocina de Lolo 2.1
I’ve always wanted to bake bread like the Artisian bread I can sometime find. Just found no-knead bread, so simple that I tried it- turned out terrefic, now make it regularly. Since I’ve started I’ve been reading and came across this blog. My question, “is all this time making this Italian bread recipe worth the effort”? Please be fair and only answer if you have made it both ways, Thanks.
No Knead is the Way to go!! Easy, Fast, Full of flavor.
Well, this just looks lovely! There is nothing quite like fresh Italian Bread! I have my family recipe up on this page here that you all might EnJoY!
Anthony’s Italian Bread Recipe
http://www.spaghettisauceandmeatballs.com/italian_bread.html
My recipe calls for a lot more rising of the dough. I have found the process of letting the dough rise three times really makes a hearty bread. Just wonderful!
Mangiare, ottenere grandi! (Eat, Get Big!), That’s what my Italian Grandmother always used to tell me ;-)
P.S. ~ I love the small photo of the DC’s Jumbo Pizza Slice! I want one of those now!
Folks, I’m new to this board and saw this bread recipe. I had to do it. Here are a few observations from a guy theat worked as a baker for 6 years.
1) Bread flower is always recommended over all purpose. Bread flower has a higher gluten content, so the end product will be more elastic and less brittle. -You always want the dough to be a little sticky, but not so much to be messy. You may have to add a little extra flour to do this. Variables that effect the dough include external temp and humidity, as well as actual temp of the flour when you start the process.
2) I followed the recipe to the letter, and it turned out as represented. That means I did not ‘bloom’ the yeast first, and I did use ‘room temperature’ water.
3) The biga/starter component… It did work as written but my experience tells me to either double the water or cut the flour down to a single cup. Theoretically you’re creating a bacterial starter for flavor, and you’ll get more flavor with a soupy biga. *It works so well because you’re not adding salt at this phase*.
4) Raising ad proofing. Since the dough took a refridgerated biga, and room temp water, and I didnt really add heat, it took about 5.5 hours from start to finish. You will speed the process up by using water 80-100F and if you were to add a T of sugar… BUT this is not required. -As with all bread, don’t wait until the product starts to collapse on itself. This indicates that there is no more jump in the yeast.
5) Doneness. I’ve never used a thermometer. I usually go by 2 things… the color of the bottom and the sound of the bread. Lift up the edge and see it the bread’s a nice pretty brown. 2nd, tap the bread; you want a nice dull thump. This bread has a killer crust on it, so you’ll get a nice sound.
5) Things I’ll try next time… thinner/moister biga, adding 1T of dough conditioner, egg or milk wash, maybe sprinkling the topp with a little kosker or ice cream salt, using compressed yeast, herb flavorings.
What do you use as a “dough enhancer”?
can’t get bread that golden brown like the store bought
Try brushing the liaf with egg whites.
Hi: I made this bread the other day it came great, it takes a long time for all rises. Did you spray it with water and put it on parchment paper than on the stone. I comes out nice and golden brown.
Thank you for reprinting the Rustic Italian Bread recipe, on my first try it came out great, have been looking for a recipe like this for a long time.
Since this recipe weighs everything, I would like to know, What is ment by, putting the dough in a cool place to rise, what is cool, 70, 68, 68 degrees,since they always say to let the dough rise in a WARM place, can anybody specify, COOL.
The only change I made was, NOT putting the, BIGA, in the fridge overnight, I have made BIGA ( poolish) without refrigerating it, for as much as 24 hours, ( as long it is covered) and not had a problem, thank you again for the recipe.
Haven’t posted in a while. – Made a Dill Rye that turned out beautiful. I have a corned beef baking in the oven and it will be perfect with the rye. I still make this Italian loaf twice a month. It’s the best, flawless recipe.
Thanks for this wonderful blog.
Thanks for the update Barbara! I just made 4 loaves of the Italian bread last weekend. It freezes really well, so I always make extra.
I know I have been promise to try making a rye bread for a while, but I think I am actually going to get around to doing it soon.
Hi…Can this recipe….Rustic Italian Bread be made with all purpose flour…instead of bread flour
Hi Pat, I have made this recipe with all-purpose flour. The crust might turn out a little different, but it still very tasty. I am not sure if the crust is even worse, the results are just different. Please report back if you give it a try!
Can’t wait to try these. One great alternative to a baking stone is a cast iron griddle.
This is the best bread recipe – One vote for “The Best of “
For the biga is that 1 cup or 2 cups of water. breadworld.com says to use 2 cups of water for the starter
thanks, vinsinn
1 cup of water for the biga
this has to be one of the favorites, bread helps begin any meal and when done correct (as this recipe) complements any meal!
The first time I made this loaf I mixed about 2tbsp of minced garlic in the dough, once cooked, I sliced it in half melted some butter on both sides covered one side with shredded Locatelli and the other side with smoked Gouda. threw it on the grill for about 10 minutes, and made an amazing garlic bread. This is one of the best breads that I’ve made. I did add about 50% more yeast to the Biga, it gives an even stronger flavor. Also, before rolling the rectangle of dough I have sprinkled raisins or sliced olives, to make an olive or raisin loaf. The only problem with this bread, is that every time I make it, it goes too fast.
Hi Luke and Pamela, (I like the yeastspotting page)
I am now trying a dark onion rye. I used a rye wild yeast starter. Set out for 2 days, added all the good stuff, honey, molasses and dryed onion. It smelled incredible. Now the recipe says to let it rise for 4 hours before forming. I ran home for lunch and it has only grown a little. I’m hoping by 5:00 it will be large enough to form a loaf. Then I’ll have to wait another 90 minutes for the boule to rise. I’m thinking i’ll put it in the fridge over night and take it out tomorrow morning and bake it at 5:00.
I hope this one isn’t as dense as the others. I think the problem is the rise time is very slow and I don’t have the patience. I’m trying to. I love good rye bread.
I’ll keep you posted and maybe take a picture if it turns out.
thank you.
Hi Barbara and Pamela, I think I am going to have to try a loaf of Rye bread now. I am going to try one of the ones from “The Bread Baker’s Apprentice”, it is a great book by Peter Reinhart. I will put a post on it and let everyone know. Thanks again for reporting back on your progress!
Hi Barbara, I just ran across this blog, found thru tastespotting. It’s yeastspotting, OMG bread heaven. As I was perusing thru along came this rye loaf. Maybe you need to knead less? I have this bread on my list for this week but I will also probably pull out the last frozen rustic italian loaf as I just made some goat cz and they are SO good together. …http://www.wildyeastblog.com/2008/09/21/47-rye/(hope posting a link is ok, sorry if not)
Hi Pamela,
The rye was way too heavy. I think I didn’t knead long enough – I should of used the mixer but I was afraid the motor would blow. I did use the wild yeast for white sour dough and it turned out nice.
I am back to baking this wonderful italian recipe that works everytime.
I haven’t given up on the rye. I have another sour rye brewing and hope to attempt again this weekend.
Thanks for writing and I’ll watch for your post.
I want to thank Luke for this recipe.
Cheers
Hi Barbara,
That sounds interesting, I have never heard of using pinapple juice. I have made a wild starter from just grapes before, yum. I loved the taste, texture and crust of the rustic italian loaf but there was definately WAY too much water. I made a double recipe then divided into 3rds and froze two. The first (fresh) one I baked spread like crazy. The first frozen one I baked didn’t look like it would rise then puffed up and looked like a football. I will check back to see about the rye bread, my mouth is watering.
Hmmm… delicious! Thank you for sharing such a great recipe. I love the illustrations to explain how to turn the dough – they are so clear, and ‘show’ what you mean. And while I’m here, congratulations on a great blog! I love your information on food photography as well – fantastic!
Hi Pamela,
I have the wild yeast brewing right now for the german rye. It’s on it’s 4th day and I’m seeing little bubbles. I found a artesian bread book at the library and copied the sour dough recipe that uses rye and pineapple juice. Interesting. We’ll see.
My first Italian loaf was very wet and hard to roll during the last stage but the second, I let the mixer knead while I added the water so the dough wasn’t as wet. When it poofs, it’s still kind of wiggly. but I wouln’t add more flour. Just sprinkle some on the counter and gently roll it on to it from the bowl.
I like this recipe but you do need to watch it every hour.
Good luck and I’ll post more on the rye bread.
HI,
i have a question about this dough.
is this original dough very sticky?
i followed this direction but the dough it’s kinnda hard for me to shape. please…how can i adjust it… i would like to try it again. thanks a lot.
Your right….the dough is sticky. Put plenty of flour on your board and your hands when you turn it out of the bowl. This will absorb and make it less sticky. As far as shaping it, turning the 2 top corners inward like “dogearing” a page, then rolling these corners downward made a perfect log.
Hi Barbara! I’m making the Italian loaf right now. I need a scale. But I carefully measured and my dough seems WAY too wet so I’m thinking not enough flour, dunno. Anwway, if you come back and see this and accomplish the German Rye, please share! I would LOVE to make a good Rye, I’m close but not close enough. Thanks
I guess this is an old blog and isn’t read anymore but I just want to share my success’es with this recipe. You have no idea how long I have been baking bricks and now that I use this recipe and my digital scale, every loaf is a success. I am so happy. I have baked 3 so far and each time the crust is beautiful and the inside is full of holes and the most important part – it tastes great.
This will be my last message on this blog as I have accomplished italian bread and will now move on to German Rye like my Grandmother used to have in Bavaria. I am searching for the rye sponge that takes a week to ferment.
Again, Thank you so much.
Ok – I made the bread this past weekend. The Biga was beautiful and bubbled perfectly. I followed the directions on spot until I came to the last forming of the loaves. I think I over kneaded as there were not a lot of air holes in the bread. It tasted wonderful but not as light as I wanted. I ran to the library and researched. I did over knead it at the end. Also, I think the dough was way too wet and needed a little more flour, that also could of made it to heavy. Anyway – I will try again. I will never give up on my quest for the perfect home made italian bread.
Thank you for the recipe.
Hi Barbara,
If I understand you right, you are kneading the bread after the last rising before you shape into loaves. DO NOT knead after the dough comes out of the “Stand Mixer”. From then on, it is gently turning the bread and rising 3 times and then gently shaping & rising.
I have made 360 loaves of Italian bread and only One came out beautiful with air holes and a crispy crust. I’ve since read that weighing everything is the key. I picked up a professional baking cookbook from a culinary school and it’s all about weighing. Makes sense. I am going to make the biga tonight from your recipe and the bread on Saturday. I can’t wait!!
I will send the results.
I completely agree Jennifer! Weighing ingredients is not only more accurate, but I have found it to be quicker too… and you can’t lose count!
I would strongly suggest that anyone planning to make this use the weight rather than the volume measurements. There are 2 systems of volume measurement: the scoop, tap and level method and the spoon and level method. If you use the former you’ll be getting approx 5 oz of flour per cup while the latter is only 4oz. That’s a pretty big difference when you’re making bread.
I think if you oiled the pan you probably wouldn’t be able to strech the dough during turning but this is just a guess.
I am trying this with my bread machine on dough setting since I don’t have a standing mixer. It seemed to work well though the machine was grunting a bit after I put the biga in. I am on the first hour so I am crossing my fingers.
Can you please tell me if you oiled the bowls that you had the dough and biga rise in?
Your bread is beautiful! I can almost taste it. But not quite, so I’m definitely going to have to try this recipe. I found your blog via your beautiful cauliflower photo on TasteSpotting (cool post – thanks for the ‘behind the scenes’ picture) and am looking forward to reading more – but of course I had to follow the bread photo link first. : )
Hi Bob, I am happy this worked for you. That sounds like a good plan. When shaping just make sure you pull the outside “skin” of the roll tight. Here are some tips on shaping rolls: http://www.taunton.com/finecooking/articles/shaping-dinner-rolls.aspx
I am going to have to give this a try too!
Absolutely the best bread recipe. Thanks for sharing.
As soon as my wife and I had our first bites, we realized that it tasted similar to some fancy named square rolls/buns we bought at Sam’s Club. They where about 4″ square and there were 6 in a bag for about $5.00.
I am going to try to make these using this recipe. I don’t think this recipe will make a dozen, but probably 8-10.
When I do the folding, I’ll sart with a square, then fold each corner into the center, turn over put on parchment for final rise. Cooking time may be a bit less as well.
Thanks Tony, This is one of my favorite recipes for bread, so I am happy to be able to share it.
Looks like a marvelous bread recipe which I will definitely bake.
Your diagrams are clear and so easy to understand.
Great job and will be checking out the rest of your blog.
Thanks,
Tony
I am so happy it worked. It definitely takes a bit of time to make but it usually ends up being worth the effort.
I made this bread yesterday. A bit time consuming but worth every minute. I will be making this on a regular basis according to my Husband – The Bread King
He and I both loved it, the crust, flavor & richness was the best bread yet.Thanks for the recipe!
i made it
it has been excellent
i really liked it
Very nice pic instructions and great looking bread :-)
I just may have to try this out this weekend!