
There are bread recipes, and then there are bread recipes. This is one of the latter. The bread’s taste, texture, crust and even recipe, strike the perfect balance between complex and simple. It is something in between sandwich bread and a rustic country loaf. This recipe has a lot of steps, but it is pretty much fool-proof. You will end up with something tasty, if not pretty!
This bread’s secret is the pre-ferment (or biga) you make the night before and place in the fridge. The pre-ferment gives the bread its flavor and helps out the texture. Using a pre-ferment gives you many of the benefits of a sourdough, but is a ton easier.
The recipe may look a little complicated at first, but really it is pretty easy. Here is a quick overview:
- Mix the pre-ferment – flour, yeast and water, together in a bowl with a spoon
- Refrigerate the pre-ferment over night
- Mix the pre-ferment together with remaining items for the dough (salt, water, flour and yeast)
- Let the dough rise for 2-3 hours, turning every hour
- Shape into a loaf, and let rise for an hour
- Bake!
Here are some good things to have for this recipe, but you can live without:
- A plastic bench scrapper – These are about $2 at Sur La Table or other kitchen stores. You can get away with a large spatula.
- Parchment paper – Parchment paper is non-stick, silicon coated paper, that is oven safe and make it easy to transfer to loaf to the oven.
- Pizza stone – Helps get you a great crust. Unglazed quarry stones from Home Depot could also work. If you don’t have either of these, just use a baking sheet.
Rustic Italian Bread
This recipe is from Cook’s Illustrated, an amazing magazine. I have added my notes, but it is their recipe and they deserve all the credit.
Notes:
This recipe requires a standing mixer to make the dough, a spray-bottle filled with water for spritzing, a rectangular baking stone, and an instant-read thermometer for gauging doneness. It also requires a bit of patience—the biga, which gives the bread flavor, must be made 11 to 27 hours before the dough is made.
Ingredients:
Biga
- 11 ounces bread flour (2 cups)
- 1/4 teaspoon instant yeast
- 8 ounces water (1 cup), room temperature
Dough
- 16 1/2 ounces bread flour (3 cups)
- 1 teaspoon instant yeast
- 10.7 ounces water (1 1/3 cups), room temperature
- 2 teaspoons table salt
Directions:
For the biga:
Combine flour, yeast, and water in bowl of standing mixer fitted with dough hook. Knead on lowest speed (stir on KitchenAid) until it forms a shaggy dough, 2 to 3 minutes. Transfer biga to medium bowl, cover tightly with plastic wrap, and let stand at room temperature until beginning to bubble and rise, about 3 hours. Refrigerate biga at least 8 hours or up to 24 hours.
For the dough:
- Remove the biga from refrigerator and it let stand at room temperature while making dough.
- To make the dough, combine flour, yeast, and water in bowl of the standing mixer fitted with dough hook. Knead the dough on lowest speed until rough dough is formed, about 3 minutes.
- Turn the mixer off and, without removing the dough hook or bowl from the mixer, cover the bowl loosely with plastic wrap. Let the dough rest for 20 minutes. (This allows protein in the dough to relax, making for a stronger dough that can rise higher, with a better crust)
- Remove the plastic wrap over the dough, and add the biga and salt to bowl. Continue to knead on the lowest speed until ingredients are incorporated (dough should clear the sides of the bowl but should stick to the very bottom), about 4 minutes.
- Increase the mixer speed to low (speed 2 on a KitchenAid) and continue until the dough forms a more cohesive ball, about 1 minute.
- Transfer the dough to a large bowl (at least 3 times the size of the dough) and cover it tightly with plastic wrap. Let the dough rise in a cool, draft-free spot away from direct sunlight, until slightly risen and puffy, about 1 hour.
- Remove the plastic wrap and turn the dough following illustrations below on Turning the Dough. Replace the plastic wrap and let the dough rise 1 hour. Turn dough again, replace plastic wrap, and let dough rise 1 hour longer.
- Dust the work surface liberally with flour. Hold the bowl with the dough at an angle over the floured surface. Gently scrape the dough out of the bowl and onto the work surface (the side of the dough that was against bowl should now be facing up).
- If you want two smaller loaves, split the dough into two equal halves. Use a knife or bench scraper.
- Dust the dough and your hands liberally with flour and, using minimal pressure, push dough into a rough 8- to 10-inch square. If you are making two loaves, shape each piece into a smaller rectangle.
- Shape the dough following the illustrations below on Shaping the Loaf, and transfer it to a large sheet parchment paper. Dust loaf liberally with flour and cover loosely with plastic wrap; let loaf rise until doubled in size, about 1 hour.
- Meanwhile, adjust the oven rack to the lower-middle position, and place a baking stone on the rack. Pre-heat the oven to 500 degrees.
- Using a single-edged razor blade, or sharp chef’s knife, cut a slit 1/2 inch deep lengthwise along top of loaf, starting and stopping about 1 1/2 inches from the ends. Lightly spray the loaf with water. Slide parchment sheet with loaf onto baker’s peel or upside-down baking sheet, then slide parchment with loaf onto hot baking stone in oven. If you are not using a baking stone or tile, simply place the baking sheet in the oven.
- Bake for 10 minutes, then reduce oven temperature to 400 degrees and quickly spin loaf around half way using the edges of the parchment paper.
- Continue to bake until deep golden brown and instant-read thermometer inserted into center of loaf registers 210 degrees. For one large loaf this will be about 35 minutes longer. For two smaller loaves this will be closer to 30 minutes.
- When the bread is done, transfer it to a wire rack and discard the parchment paper. Now the toughest part, cool the loaf to room temperature, about 2 hours.
(I traced the illustration from the recipe… I can’t draw this good!)
Turning the dough:
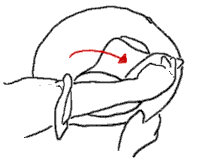
Slide plastic bench scraper under one side of dough; gently lift and fold one third of dough toward center.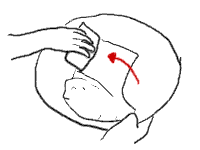
Repeat step 1 with opposite side of dough.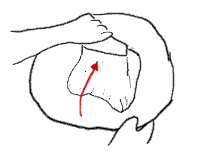
Finally, fold dough in half, perpendicular to first folds. Dough shape should be a rough square.
Shaping the dough:
After delicately pushing dough into 8- to 10-inch square, fold top left corner diagonally to middle.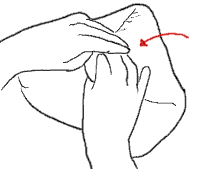
Repeat step 2 with top right -corner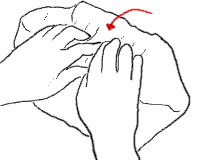
Begin to gently roll dough from top to bottom.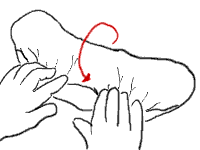
Continue rolling until dough forms a rough log.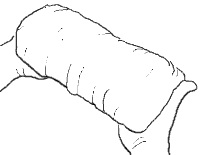
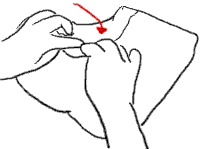
Roll dough onto its seam and, sliding hands underneath each end, transfer dough to parchment paper.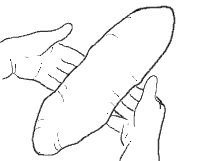
Gently shape dough into 16-inch football shape by tucking bottom edges underneath.
For anyone looking for the full recipe, it can still be found here: http://myfoodaffair.blogspot.com/2008/12/rustic-italian-bread.html
If that’s taken down, just google “rustic italian bread” and cookography. It looks like a few sites still have it re-posted.
Great recipe, worth keeping somewhere safe and sound….
I’ve used this recipe multiple times, but it appears that the webpage has lost some key parts of the recipe. The Wayback Machine has the complete recipe: https://web-beta.archive.org/web/20110204183320/http://www.cookography.com/2008/rustic-italian-bread
From the recipe to all the comments, not once did I see at what temperature and cooking time. Can someone please advise or its a dead recipe
Just made the biga and it is but it isn’t “shaggy” and I weighed the bread flour, added the 1 cup of water and 1/4 t. of yeast and set Kitchenaid to stir as directed?!?
Can’t believe there is any way the dough ball will ever ever start to bubble….
Is this “normal”?
Kim
I’ve made this recipe every Christmas for several years, and always run into the same problem. I end up adding a LOT more flour than it calls for, and as a result mix it longer than I think I should to get it to incorporate. But it still turns out great every time. I have a friend who makes it who does’t have this problem. My loaves always expand dramatically during baking and have large air bubbles; his are smaller and don’t have the larger air pockets. Both taste great and have a nice texture.
I found this recipe a few years ago and I never looked back! I have always made two loaves but was wondering if anyone has tried making it into one round loaf. I have some dough rising now and was thinking of trying it.
I made it as one oblong loaf. Turned out great. I just baked it a bit longer.
I have been searching for a “good” Italian bread recipe for quite some time. If you are looking for that perfect chew outside and soft middle, this is the recipe! However, in the “dough” portion of the recipe I needed to decrease the water to 1 cup, as suggested by another reviewer and it was perfect. Thanks for sharing this recipe with such wonderful illustrations for folding and shaping the dough.
Hi, Can I use a Bread Machine to mix the Biga and Flour on the dough cycle?
I just pulled these loaves out of the oven and they are wonderful and worth the work it takes to make them. I was out of bread flour and I used all purpose with a 1/2 cup whole wheat flour in the dough, all purpose only in the starter. It turned out great but I try with bread flour next time. It reminds us of a delicious bread we ate in Italy since we used to live there. I am very happy that this bread turned out so great and it will be a regular in our home from now on!
Hi, I’m new to bread making and I’m trying this out. I don’t have a standing mixer (and wouldn’t want to get one since I think kneading by hand is fun). Will let you know how it goes!
Ok turned out great! I have a couple of questions. I have an electric oven, should i use only lower element, upper? both?
Also, what is the cut in the bread for?
cheers
Thats great to hear! I was curious to on how it would work since it is a lot of dough. I think you would want to use both heating elements, otherwise one side of the bread would be under cooked. The cut in the bread helps the bread rise, without it the crust can hold it back. The cut gives it extra room for expansion.
Thank you Luke or the useful reply. I have just baked my 3rd bread, each time I have done it slightly different. First time I used only the lower element (turned out good but too white), second try I used both heating elements but forgot to cut the bread, third time I used both elements with very high heat (and plenty of preheating) for about 7 min and then lowered to 400F but always spraying the bread and oven with water. This time the bread raised way more and almost separated itself from the baking sheet. Also managed to get a good brown crust. I think it’s better and better every time! Now I need to find a nice baking stone!
cheers
Daniel
Wow, great story Alex!! Thanks for sharing and keep up the hard work.
Wow! I watched Julia Child watch someone make this on TV years ago, made it once, and the visitors I shared it with still rave about it every time we talk. Then I lost the recipe. :( So happy to find this. I used King Arthur bread flour and white whole wheat 50/50 (all bread flour for the biga). About 24 hour biga fridge-rise. My oven is flaky and didn’t get about 400, but it stil turned out wonderful. The inside looks like a giant English muffin. Fantastic with hummus, plain, or with butter and homemade plum jam. Start-to-finish about 34 hours, but worth every minute of it. Thanks for posting it!
The best italian bread recipe ever, love love it, turned out perfect in my gas oven, thanks a million:-)
Well I have just finished baking and I must say, It is just beautiful and very tasty. The best bread that I have cooked yet. I also baked walnut bread and there again it called for Biga. I must say I prefer to use biga because it does add to the taste.
I would like to know the size of this or these loaves of bread. Our regular weight after baked is arount 24 oz. and about 18 inches long. Its a waste of energy just to make one. While the oven is on you might as well make 2. Thank You Bart
Just came across your recipe. Being Italian and growing up as such I have some darn good food. Couple of slight differences than my recipe. But this is the way my nonna and bisnonna made it so I will see. So far the dough right from the start is so smooth and silky. I know this is going to be fantastic. Now on to make the Ricotta. I will let you know how it comes out
Well made the bread, as soon it came out of the oven it was devoured! Absolutely fantastic, won’t use another recipe now. Started another Biga last night and making another for today.
This is an excellent recipe and similar to the one I’ve been using for years. I do have problems sometimes where my bread will come out tough, dry or too dense. Could I be using a little too much flour when this happens?
Yes, you may be using too much flour. Your dough should be very elastic, not dense and dry. When you push your finger into the dough it should bounce back to shape. Also make sure you knead your dough enough. The more the better. I use my kitchenAide mixer to get everything started and finish by kneading by hand. I usually knead the dough for at least 15 minutes. So cut back on the flour or add more water initially and it should solve your problem.
can you mix the biga with a food proceser and also mix the biga and dough with a food proceser
In step 8, it said to “Dust the work surface liberally with flour”, is it bread flour or all-purpose flour? I love bread and I am going to try this recipe so I want to get it right it. Thank you.
For dusting I usually use All Purpose – but it doesn’t really matter
Who said man cannot live by bread alone ? This recipe gives outstanding results. Try it toasted with smart balance and jelly.
I noticed that a few had a little problem with the dough being to loose. Did you Weigh the flour or Measure it? The best method is to weigh the flour, as some flour has more moisture content due to nature and storage, and will affect the outcome. The best and most successful baking reciepts I’ve used call for weighing the dry ingredients.
Happy Baking
PHD
Could this bread be made with Whole Wheat flour in part or total and how would the ingredients change?
Pingback: Rustic Italian Bread | Cooking with Chrissy
This is hands down the best Italian bread that I have made. I didn’t refrigerate the biga, just left it in the bowl of the stand mixer (covered) overnight and it still turned out perfectly. This is my go to recipe from now on
From the very first time I made this bread I have had wonderful success. I’ve been making it every other week since I found the recipe – the crust is wonderful and the texture of the bread is beyond anything I have ever found in a store or bakery. It reminds me of my Noni’s homemade Italian bread toasted with butter and home made jelly. YUM. Thank you for posting the recipe.
I know, I really love this recipe. Unfortunately I don’t end up having enough time to make it often. Glad to hear that it is working out so well!
Pingback: Goat cheese balls in tomato sauce appetizer
Hi, second time trying to leave a comment.
Following the recipe, everything just as you write it until I got to putting the two doughs together. After a minute it was obvviously not going into a smooth ball. I added about 1-2 Tbsp of flour around the outside of the bowl to tighten it up, but that didn’t work.
What happened there? It’s just in the rising bowl as I write this, very loose, wet.
You might just have to add a bit more flour… a couple tablespoons at a time. If you don’t use weight to measure the flour and water, you sometimes have to adjust.
Out of curiousity, why didn’t the comment work the first time? It looks like it went through.
Thanks,
Luke
I had a simular problem. The dough was a little on the loose side and hard to shape. I think that when adding 1 1/3 cups of water was a little to much. The bread had a great taste and will continue to make, but I think I will only add 1 cup to the dough when making it.
Hi, Made all as you described, no problem. When I got tothe point of mixing the biga with the dough, it did not go into a ball. It got looser and looser and very wet. So I added about a TBSP of flour along the sides, no good. Just put it into the bowl to rise for first time. What happened that it loosened up?
Pingback: Rustic Italian Bread | Dad Bakes