Vote for us in Project Food Blog!
(Especially if you are a FoodBuzz Featured Publisher, only their votes count, go figure)
So we made it to the next round of Project Food Blog…yay! No time to bask in our victory though, we are on to the next challenge:
Ready to tackle a classic dish from another culture? Pick an ethnic classic that is outside your comfort zone or are not as familiar with.
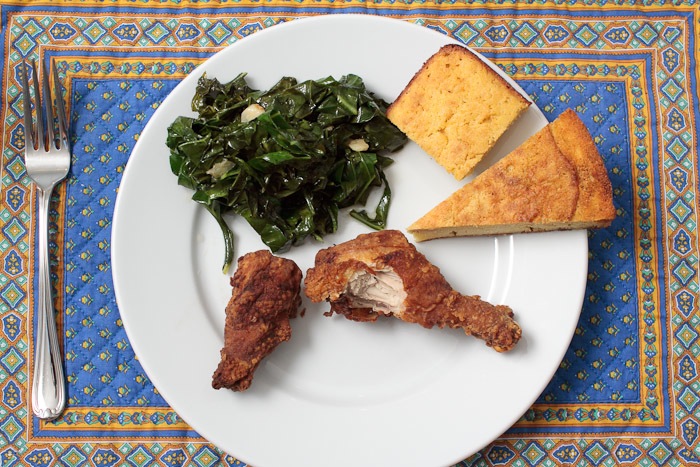
Carolyn and I have traveled around a bit–I lived in Hong Kong and she lived in Spain for study abroad. We are by no means globe trotters, but we have eaten and cooked a lot of different “ethnic classics” between us. So instead of faking it and rehashing an old dish, we decided to take on the challenge in earnest. Both of us grew up in Massachusetts and are true Yankees at heart (not Yankees fans, mind you). One cuisine that is truly foreign to us and presents a real challenge is Southern food. This maybe a stereotype, but to me the classic Southern dish is fried chicken and greens.
Of course having no experience with Southern food, means we have no go-to recipes. Luckily, our favorite local neighborhood bloggers, Zach & Clay over at the Bitten Word, are genuine Southerners. They recently did a taste test between Thomas Keller’s overly-fussy fried chicken and Clay’s mom’s. After Clay’s mom’s chicken handily won, we knew we had found our recipe. While we were over at the Bitten Word, we also found a modern-Southern recipe for Collard Greens, which is supposedly better than the traditional version their grandmothers used to make.
I should mention that in addition to having no experience with Southern food, neither of us had ever fried anything before. This should be good!
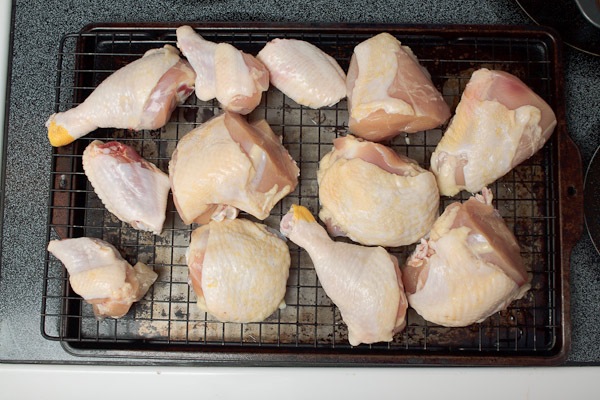
The first step was to brine the chicken, preferably for 8-12 hours. Luckily for us, Elena, our 8-month old, was kind enough to wake up early so we could get the chicken going early. The brine is just salt and water. Simply cut up the chicken, as described below, put it in the brine and refrigerate.
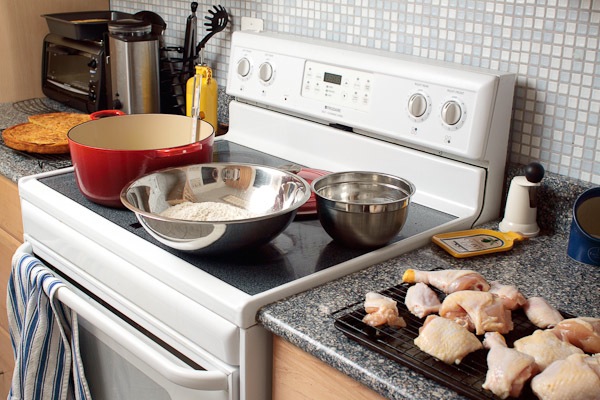
While the chicken spent the day brining, we picked up some collard greens at the farmers’ market and went to Mr. Yogato for some FroYo & Trivia (5 countries that end in L, leave your answer in the comments). We emailed Clay and he recommended adding a bit of paprika and cayenne pepper to the flour mixture. I one-up that and also added some garlic and onion powder. I dried off the chicken and put it on a rack in the fridge to dry off a little more. I also had some buttermilk left over from our cornbread experiment, more on that in another post, so I went with a half milk/half buttermilk mixture.
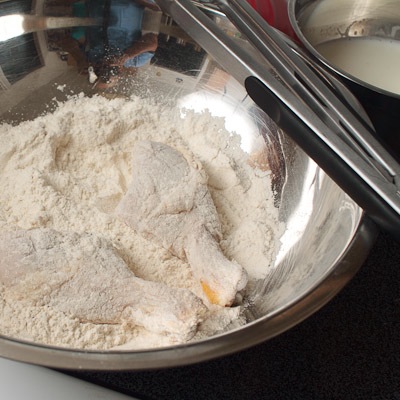
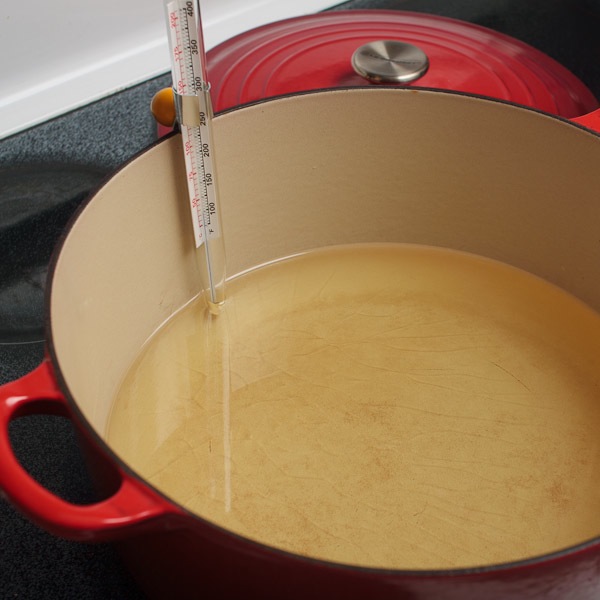
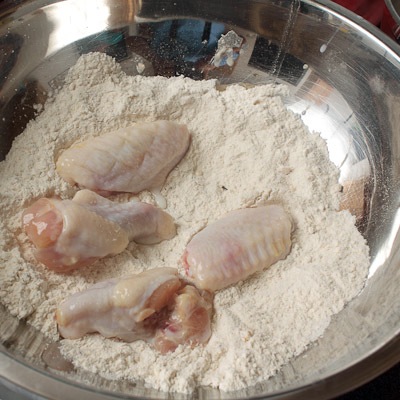
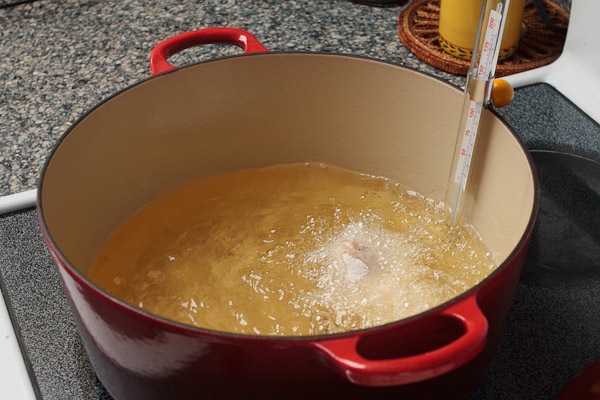
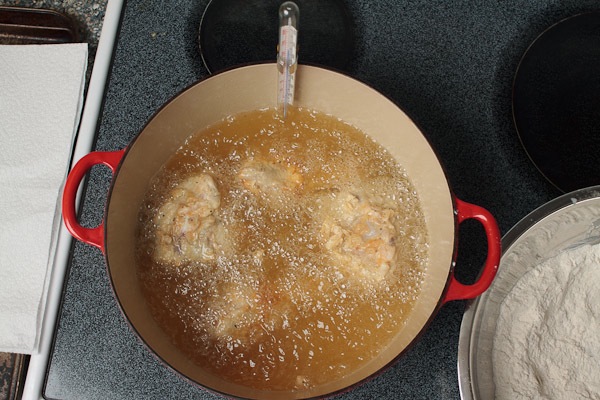
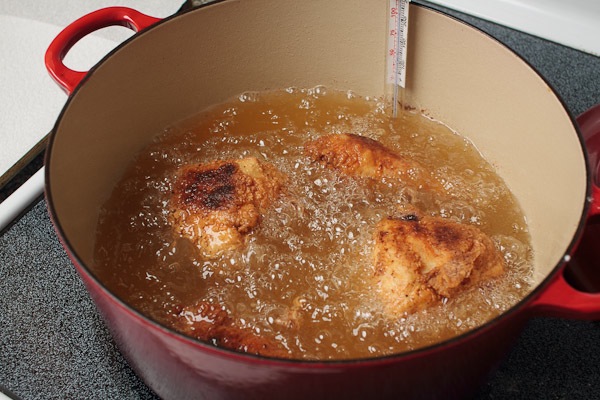
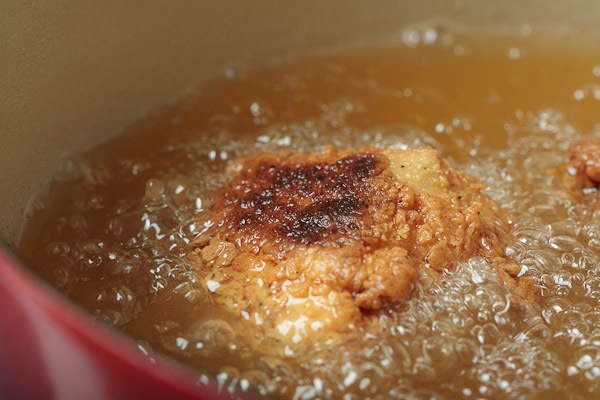
With the chicken and batter all set, it was time to face my fears and get things set up for frying. I poured an entire container of canola oil into our dutch oven, attached a thermometer and turned up the heat. As the oil crept toward 375 degrees, I began breading the first batch of chicken parts, dunking them in milk and then coating them in flour. Once the oil reached temperature I began adding the chicken. This was the part I was nervous about, I thought the oil might explode out of the pot in one massive bubble. When I dropped in the first piece there was some angry bubbling, but nothing like what I imagined. Over this initial hurdle, I added the other pieces, covered the pot and let it cook on the first side for 8 minutes. I ended up cooking all the pieces in 3 batches–cooking the thighs for 10 minutes on each side and everything else for 8 minutes per side.

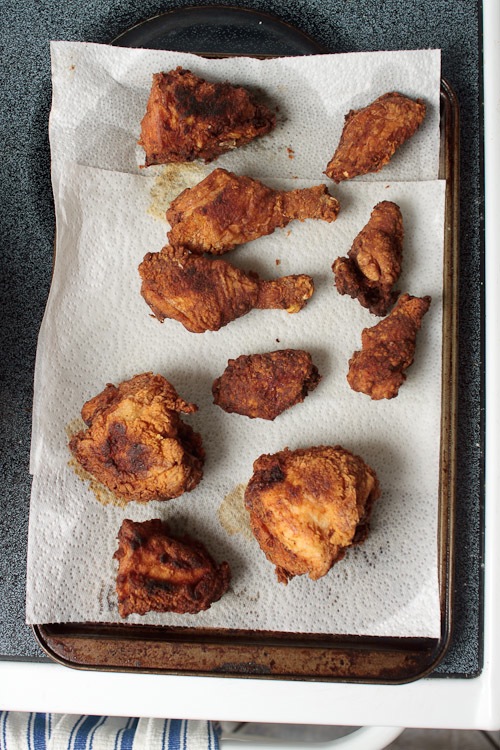
I am sure if you have been frying chicken for most of your life, it comes pretty easy to you. However, to a newbie like me, this does not seem like a simple go-to dish. It takes a bit of planning and takes a while to fry everything up. That said though, the results are amazing! It is amazing how a simple preparation and a couple of basic ingredients can produce something so delicious. You always here the mantra that quality ingredients don’t need much fussing to shine…but I didn’t use quality ingredients. I went for the on-sale Purdue chicken at Safeway and cheap canola oil. I didn’t bother with free-range, extra-virgin anything and still had amazing results. To me this might be one of the biggest take-aways from this Southern adventure–good food doesn’t need fussiness.

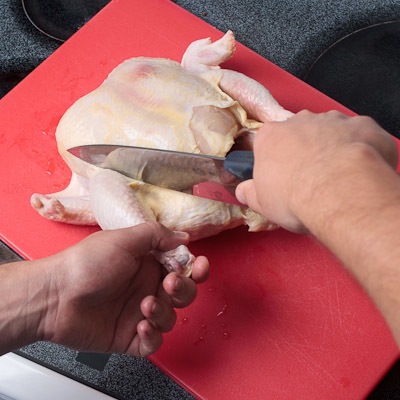
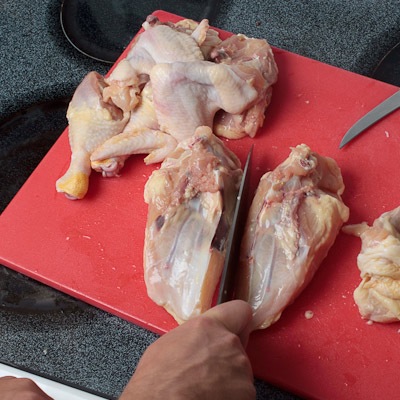
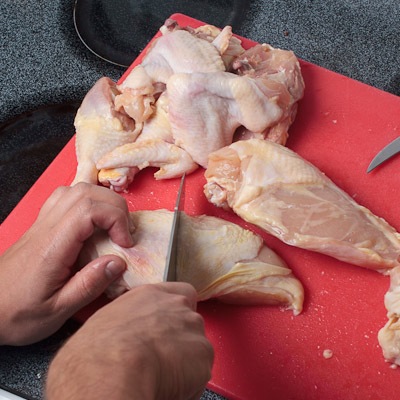
How to cut up a chicken:
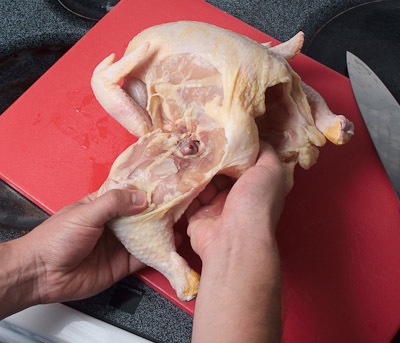
- Flip the chicken on its back, so the breast meat is facing up. Use a sharp chef’s knife and cut through the skin around the leg where it attaches to the breast.
- Using both hands, pop the leg joint out of its socket.
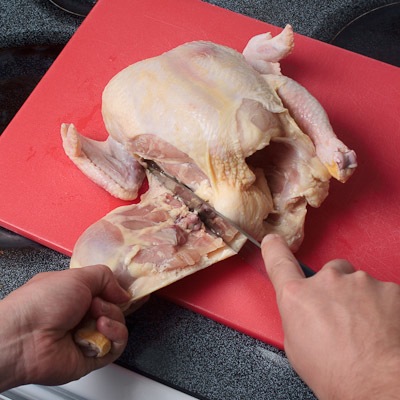
- Use a chef’s knife to cut through the flesh and skin to detach the leg from the body.
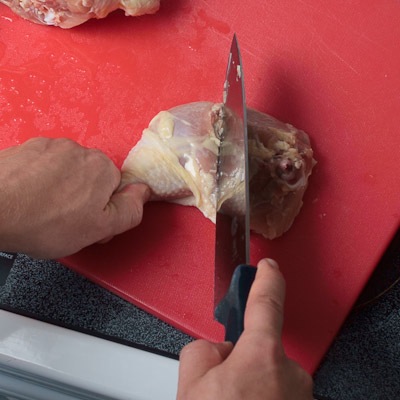
- A line of fat separates the thigh and the drumstick. Cut through the joint at this point. Now go back and repeat these steps for the other leg.
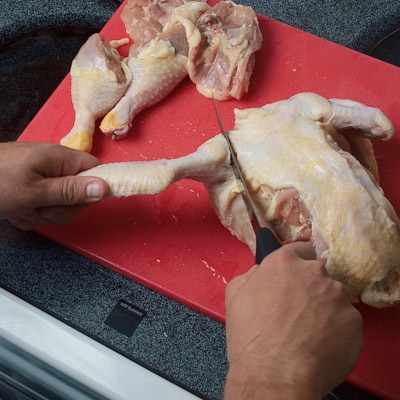
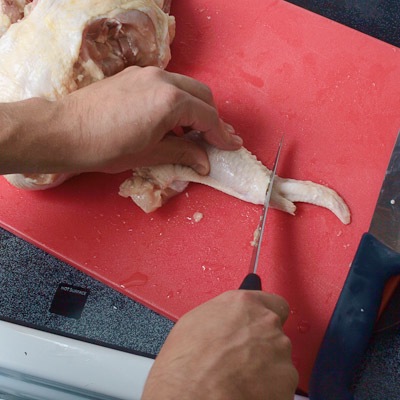
- Bend the wing out from the breast and use a boning knife to cut through the joint. Repeat this with the other wing.
- Cut through the cartilage around the wingtip to remove it. Throw out the the tip.
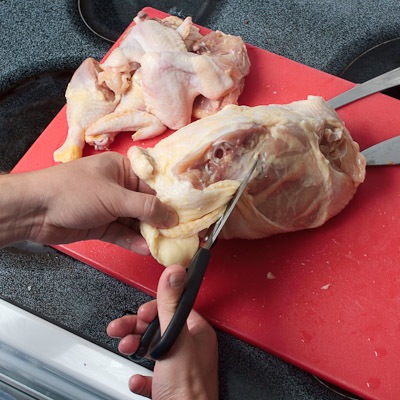
- Using poultry shears, start on one side and cut along the ribs closest to the breast meat.
- Cut all the way from the butt to the neck…
- Now do the same thing on the other side of the back.
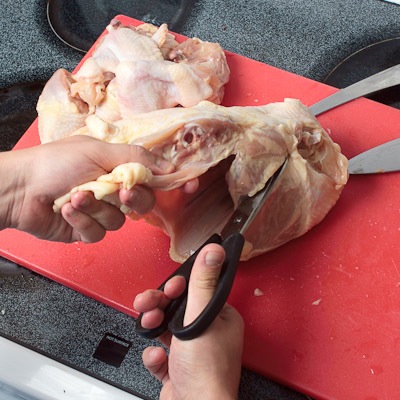
- You should now be able to completely take off the back. Freeze it and make some soup with it and the giblets later. You did save the giblets, right?
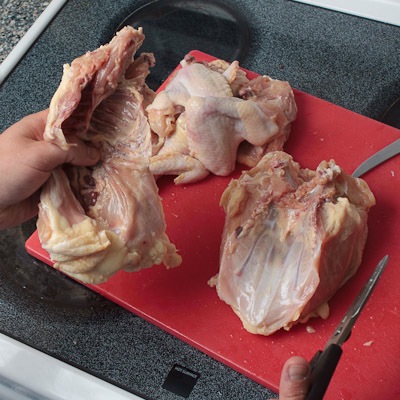
- Take your chef’s knife and place it on the breastbone. Apply pressure to cut through and separate the breast into halves.
- Cut each breast in half crosswise into two pieces.

Thanks for the Support everyone!!! Hopefully we will make the cut. We should find out in a bit.
Voted for you and good luck with PFB :)
I would like to invite you to participate in my giveaway
http://atasteofkoko.blogspot.com/2010/08/mini-pistachio-tea-cakes-40.html
Here is my entry for PFB http://www.foodbuzz.com/project_food_blog/challenges/2/view/1039
Nice job with that chicken. It looks like it was made by a true Southerner! You have my vote :)
Looks delish! You have my vote. Good luck!
Loving your instructions on how to cut up a whole chicken – I really need those. Always manage to hack up the poor bird to beyond recognition.
Love your concept. Great post :)
Glad I stumbled upon this! Great pictures and post! You’ve got my vote for sure!
I just came across your site and i think it is great. You have my vote. Your pictures are amazing. Nice work. I am going to check out some of your turorials.
Sounds wonderful!
Great post, guys. I flaked on PFB, so my vote is for you!